
This document describes how to set up your delivery charges on your website using bands.
What is a Carriage Band?
A carriage bands is a group of products within your stock tree that have the same carriage cost.
What is a Carriage Region?
A carriage region is the way to determine differing delivery regions for which you wish to charge differing carriage rates as per your carriage supplier (e.g. Royal Mail, Courier etc).
How is Carriage Calculated?
The actual carriage charged to the customer is calculated from a combination of which band the product is in and which region the customer is in.
How to set Delivery Charges in Band Mode
Click on Tools in the Windows Menu Bar at the top of the Back Office window. Choose Configure from the drop down list. The Systems Options window will appear.
Click on the Configuration tab.
![]()
Click on and expand the Website group. Highlight Carriage Mode. Choose one of the following ways to charge carriage to your customers:
By entering an H in the right hand window a delivery charge is attributed which is applicable only to the highest banded article on a Sales Transaction i.e. you only wish to charge the customer a single value for carriage which is equal to the highest banded item.
By entering a B in the right hand window a delivery charge equal to the sum of all bands applied to all articles on a Sales Transaction i.e. charge the customer a delivery charge for each item purchased.
Either
enter ‘H’ in the right hand window
Or
enter a ‘B’ in the right hand window.
If the default configuration settings have been changed (as above), click on the OK button and re-open the System Options as the changes made in the Configuration tab will affect the Preferences tab.
Follow the steps above.
[su_divider]
How to Create Additional Carriage Bands
Click on Tools in the Windows Menu Bar at the top of the Back Office window. Choose Configure from the drop down list. The Systems Options window will appear.

Click on the Preferences Tab.
![]()
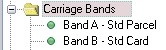
Click on and expand the group labelled Carriage Bands. Two bands are created by default: Band A – Std Parcel; and Band B – Std Card.
Click on the New Icon.
![]()
Name the carriage band by over typing the highlit name of New Item, press the enter key to confirm name. Click on the Save Icon.
![]()
[su_divider]
How to Create Additional Carriage Regions.
Click on Tools in the Windows Menu Bar at the top of the Back Office window. Choose Configure from the drop down list. The Systems Options window will appear.

Click on the Preferences Tab.
![]()
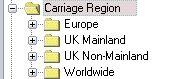
Click on and expand the group labelled Carriage Region. Four regions are created by default: Europe; UK Mainland; UK Non Mainland; and Worldwide.
Click on the New Icon
![]()
Name the carriage region by over typing the highlit name of New Item, press the enter key to confirm name. Click on the Save Icon.
![]()
[su_divider]
How to set a Charge for each Combination of Band and Region.
Click on Tools in the Windows Menu Bar at the top of the Back Office window. Choose Configure from the drop down list. The Systems Options window will appear.

Click on the Preferences Tab.
![]()
Click on and expand the group labelled Carriage Bands – Carriage Region. An entry for each carriage band and region combination will be listed.
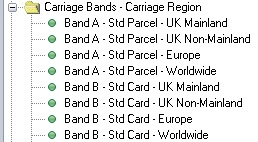
Click on each combination and enter a delivery charge in pounds and pence in the right hand window. Please note that a £ sign is not required but a decimal point is required.
Enter value for delivery for that type of band and region as per your carrier.
[su_divider]
How to Attribute a Band to an Article (Product).
Click on Active Stock Button.

Highlight a particular article in the stock tree.
![]()
Enter the band for the product into the field labelled Carriage band by clicking on the down arrow to the right of the field and choosing a Band.
![]()
[su_divider]
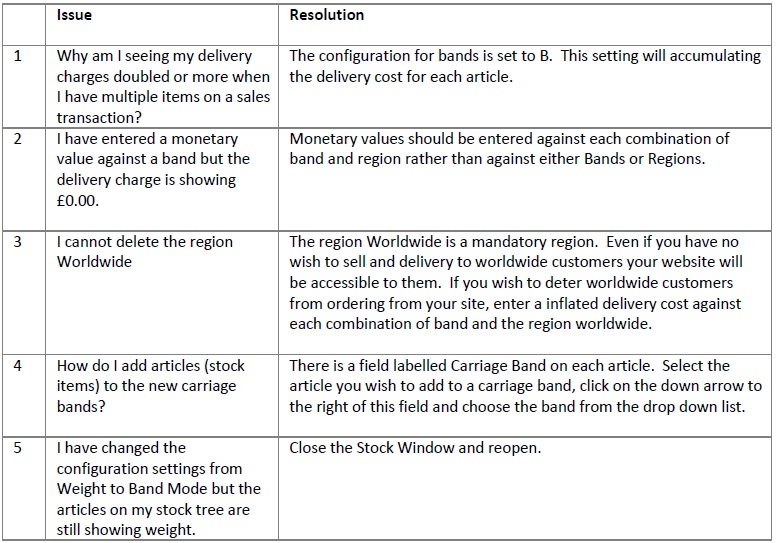
Troubleshooting Guide
[su_divider]