
Google requires specific product information to be included in the Froogle File that gets submitted for use with Google Shopping Feed. This document will guide you through tagging products with relevant attributes used for Google Shopping or Free Listings.
The Google Summary of Attribute Requirements can be found at the following link: https://support.google.com/merchants/answer/1344057
The Google Product Feed Specification can be found at: https://support.google.com/merchants/answer/188494
The Froogle File automatically includes the following headers and information from Connect:
gtin, brand, mpn, link, title, description, image_link, product_type, price, id, condition, availability, shipping.
Most products are required to have 2 out of 3 Unique Product Identifiers to be accepted into the Google Merchant Center. Unique Product Identifiers are
GTIN numbers,
Brand and
MPN (manufacturer part number)
and you can find where this information is stored in Connect below:
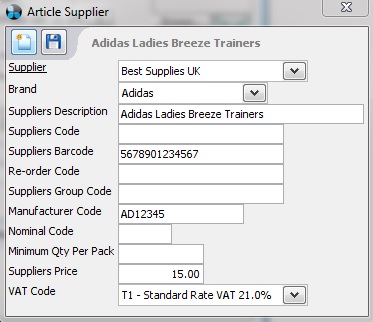
Brand: is taken from the ‘Preferred Supplier’ window under the ‘Brand’ section.
GTIN: is a 12, 13 or 14 digit barcode. GTIN is taken from the product ‘Barcode’ field but if this is empty it will then be taken from the ‘Suppliers Barcode’ field under ‘Preferred Supplier’. For more information on GTIN’s please see https://www.gtin.info
MPN: is taken from the ‘Manufacturer Code’ under the ‘Preferred Supplier’
Google also require other attribute information depending on what type of item is being sold. For each attribute you will need to create a new tag set with the relevant tags. These tags can then be uploaded to the Froogle File. Please contact helpdesk to have additional headings/ fields added to your Froogle File.
[su_divider]
Creating Tag Sets
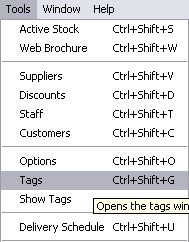
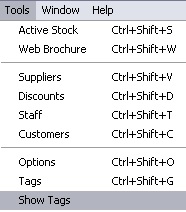
From the Back Office open the ‘Tools’ menu and select ‘Tags’.
The ‘Tag Set’ window will appear. Click on the ‘New’ Icon.
![]()
The Tag Set window will appear.
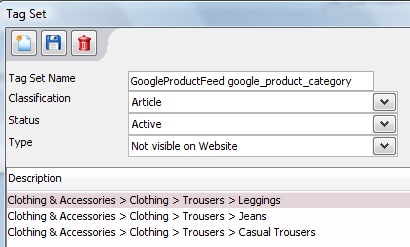
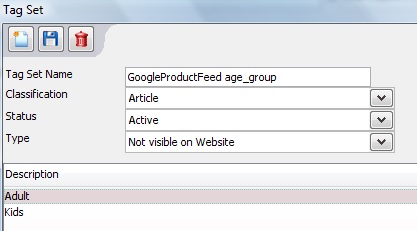
The first part of the Tag Set name is ‘GoogleProductFeed’.
Enter in the Google attribute name as per the list found at https://support.google.com/merchants/answer/188494
For example:
GoogleProductFeed google_product_category
or
GoogleProductFeed age_group
Set the following fields as below;
Classification ‘Article’
Status ‘Active’
Type ‘Not Visible on Website’
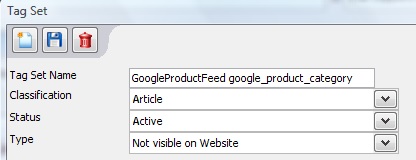
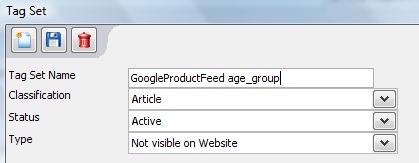
‘Save’ the tag set.
![]()
[su_divider]
Creating Tags
In the Tag Set click on the ‘New’ Icon
![]()
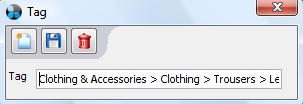
The ‘Tag’ window will appear. Enter the first tag name in the field labelled ‘Tag’.
For Google attribute names please visit https://support.google.com/merchants/answer/188494
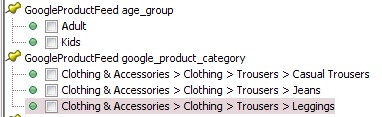
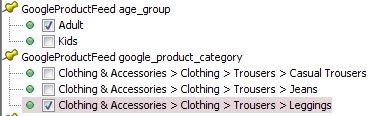
For example in google_product_category: Clothing & Accessories > Clothing > Trousers > Leggings
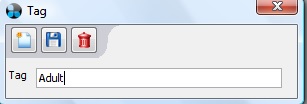
or in age_group:
Adult
Click on the ‘Save’ Icon
![]()
Continue entering all required tags based on your chosen Google attributes. This will create a list of all tags in the Tag Set Window.
For example in age_group the only accepted attribute values are “Adult” and “Kids”
When all Tags have been created hit ‘Save’.
Click on the red cross in the top right hand corner of the Tag Window, Tag Set Window and Tag Sets window to return to the Back Office.
![]()
Close and open Connect to complete the creation of your new tags.
[su_divider]
Apply Tags
From the Back Office click ‘Tools’ and choose ‘Show Tags’.
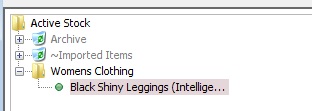
Open the Active Stock Tree.

The Tags Window will appear on the right hand side of the Back Office window.
Highlight the article to which you wish to apply a Tag.
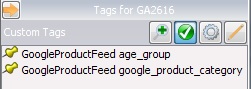
The Tags window will show all available Tags that can be applied to the articles.
To tick the boxes next to the Tags, you need to select the ‘Edit’ icon. This will allow you to tick and un-tick tags for each article, supplier or customer.
![]()
Click on the checkboxes next to the available Tags which you wish to apply.
Click on the ‘Edit’ icon again when you have finished editing.
![]()
[su_divider]