
For users sent a Cypherlab 8230 & Wireless Access Point
The following document describes all the settings required to get a handheld stock device (HHSD) for stock functions communicating to the wireless network. This document assumes you have a Wireless Access Point that has been pre-configured by Intelligent Retail.
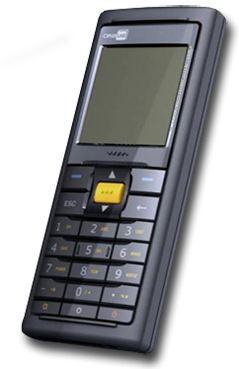
Handheld Stock Device (HHSD)
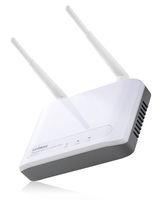
Wireless Access Point
[su_divider]
STEP 1: IR Connect Setup
Choose a Designated Server.
- Need to choose a Till/Back Office Connect license on a computer that will act as the server for your HHSD. This will be the Till/Back Office computer that the HHSD will send its data to. Therefore, it is important that you choose a machine that will be powered on when you perform all functions on the HHSD.
- Make sure the Connect software and Interconnect is running on the Designated Server.
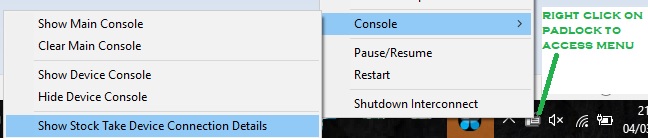
- Write down the IP addresses of the Designated Server, the subnet mask and default gateway. To find the IP address :- Right click interconnect, select “Console”, select “Show Stock Take Device Connection Details”.
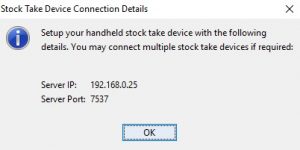
- Write down the IP addresses, they will look something like this, ie.
- Turn off Windows Firewall and any other Firewall on the Designated Server .
- Ensure a swipe code exists for any user(s) on the Designated Server. The swipe code will be needed to login when using the HHSD.
[su_divider]
STEP 2: Wireless Access Point Setup
- Unpack the Wireless Access Point.
- Plug the Access Point into your network (i.e. plug it directly into a spare network port on your router or a spare network port on your switch (if you have one)).
- Plug the Access Point into a spare power socket on the wall.
- You will notice that the PWR light is illuminated green on the Wireless Access Point.
- The LAN light is green and WLAN is orange.
[su_divider]
STEP 3: Configuring HHSD to Your Network
Press and hold 7+9 and then power button at the same time on the HHS to access the System Menu.
Select with up/down to navigate, type or press the corresponding number, after each selection, press either of the [blue] buttons to confirm.
Press number 8, labelled “Next Page”
Press number 5, labelled “Wi-Fi Menu”
Press number,2 labelled “Network Setting”
Sselect option 1 “DHCP” – Check it says “Enable” – Press blue button to confirm
Press ESC to “Wi-Fi Menu”
Press number 3, labelled “WLAN Setting”.
Select option 2 “SSID”
Press Fn to change from number to text input
Enter IRHHS, ie. [4]x3 to get I, [7]x3 to get R, [4]x2 to get H, [4]x2 to get H, [7]x4 to get S.
Press blue button to confirm
Press Fn – 3 times until symbol in bottom left of screen disappears (back to number input)
Press ESC
Press number 4, labelled “Security”.
Select option 4 “WPA menu”
Select option 2 “WPA2 setting”
Press down, check it says Enable – press blue button to confirm
Select option 3 “Passphrase”
Enter 5766358388 – press blue to confirm
Press Esc back to the “Wifi menu”
Select option 5 “Echo test”
Select option 2 “Sever mode”
Wait for connection
Press red Power button to Turn off.
[su_divider]
FINAL SETUP: Ready to Go
Press the red power button on the HHSD to turn it on.
Press number 2, labelled “WAN SETTING”.
Press number 6, labelled “Server IP”.
Enter the details as noted down before from the Designated Server Interconnect menu…
Type in the IP address of the Designated Server, eg. 192.168.0.25
Press either blue button to confirm.
Press number 7, labelled “Server Port”, eg. 7537
Press either blue button to confirm.
Press ESC to main menu, ie. “1. Take Data”
Now that the HHSD is now setup for use, refer to Handheld Scanner User Guide for more detailed information on how to use the device for all functions.
Important: You MUST log out after each use otherwise the scanner does not drop the session correctly. If you turn the scanner on and it’s not responding or the menu looks corrupted, this is the cause. To remedy, shut down the Connect software, hold 7+9+pwr on HHSD, power HHSD off then on, restart Connect
[su_divider]