
(Note: This guide explains the process of managing any web transactions received via an Intelligent Retail website and 3rd Party Web Service integration.)
This guide describes the various stages in managing your web transactions:
- Viewing Web Sales
- Printing Web Sales
- Picking, Packing and Despatching of Web Sales
- Processing Zero Value (Unpaid) Web Sales
- Voiding Zero Value (Unpaid) Web Sales
- Viewing historic Web Sales
- Processing Web Returns
Web sales are downloaded automatically at set intervals as per system configuration.
All web transactions are shown in the Web Panel, bottom left hand section of the till screen.
Details of each web transaction are shown in the following format:-
Date & Time of Transaction ¦ Number of items ¦ Total Paid Value of Transaction ¦ Status of Transaction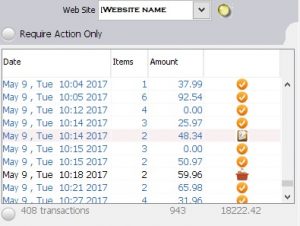
The Web Panel window shows by default all transactions which Require Action Only, ie. Transactions that still need to be processed, all complete transactions are there but not shown. See further below how to retrieve completed transactions.
How to view a Web Sales Transaction
- Double click on a single transaction within the Web Panel
- The details of the transaction will now appear in the right hand sales transaction window, displaying all information about the order. (Note: This has the same format a normal sales order transaction through the till.)
- A scrolling banner will appear at the bottom of the sales transaction window giving the details of:
![]()
-
- Web Sales Number, eg. P56394 – This is the order number that customers receive in their order confirmation email
- Date/ time the order was created on the website.
- Date and time the order was submitted for payment to the ePayment provider.
- Date and time the payment was authorised by the ePayment provider.
- Black Area -Review the charge for delivery (if applicable) and ensure that the payment has been taken under Total Amount, eg.

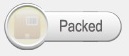
- Six additional buttons will appear under the sales transaction window:

- Allocated – Illuminated by default as this means the stock is reserved for this order.
- Picked
- Packed
- Despatched
- Void
- Under these buttons will be the customer’s billing and delivery details.

TIP: Click on Delivery Address to see where the item is to be collected in store or to be delivered.
[su_divider]
How to Print a Web Sale
Viewing the transaction as above.
 Click on the Print Button.
A till receipt will print out followed by a gift receipt.
Additional information printed on these receipts:
- Sales Reference Number
- Unique Sales Reference Barcode
- Delivery Address
- Billing Address if the web customer has requested delivery to different address.
[su_divider]
Picking, Packing and Despatching of Web Sales
Note: Each stage of the web order is date/time stamped and the latest stage can be seen by a customer if they login to their ‘My Account’ page to check order details.

Physically pick the items that are shown on the web receipt.
These items can be picked and left to pack at a later time in the day.
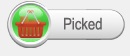 Click on the Picked button when the items have been picked. This will illuminate and a Shopping Basket icon will now appear next to order detail in web panel.
Physically pack the items that are shown on the web receipt.
These items can be packed and left ready for despatch at a later time in the day.
Click on the Packed button when the items have been packed. This will illuminate and a Labelled Box icon will now appear next to order detail in web panel.
 This is the final stage.
When the items are awaiting to be despatched.

Click on the Despatched button when the items have been sent. This will illuminate and a ‘Red Truck’ icon will now appear next to order detail in web panel. The order also disappears from the list as this is now completed.
[su_divider]
Processing Zero Value (Unpaid) Web Sales
If you would like to download abandoned basket (unpaid) transactions and then be able to contact the customer and take payment for the web order over the phone or in person, then process the transaction as follows:-
- Recall the transaction as shown above with the transaction number or double clicking.
- Click on the
- Take payment and select the the payment provider, ie. Sagepay, Paypal or Card
- The transaction will now move out of the web panel and into the till transaction panel, thus updating the takings on the till for the day on which it was processed.
[su_divider]
Voiding Zero Value (Unpaid) Web Sales
Sometimes zero value orders will be downloaded as customers may be shopping and abandon their baskets. In order to clear this out of the customer account online and off the ‘Require Action Only’ list. Do the following:-

Click on the Void button.
This will clear the screen and …
 … mark the order as void and cancelled.
![]() This will place a ‘Red Cross’ icon next to order in web panel, this will also make the order disappear as no further action is required.
This will place a ‘Red Cross’ icon next to order in web panel, this will also make the order disappear as no further action is required.
[su_divider]
Viewing historic Web Sales
You can recall previous list of transactions by clicking on:-
![]()
Click on the round radio button to get the filter screen
![]()
Click on ‘Show all transactions for a date range’ and select the date range required.
This will then display all the web transactions for this period in the web panel.
Select the needed and double click to view full detail on the transaction window on the right.
TIP: When done, press ‘Esc’ on keyboard or select ‘No Sale’ > Cancel to clear the filter on the web panel to revert back to ‘Require Action Only’
[su_divider]
Processing Web Returns
Scan the barcode on the receipt, enter the unique web order number or search for the receipt as previously detailed by customer account (CLU > View customer transactions).
The Web sale will appear in the Sales Transaction Window on the right.
If you wish to return one item from the web order, click and highlight the single item.
![]()
Click on the Return button.
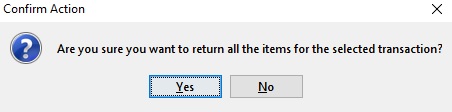
If you wish to return all items on the web order, click on the Sub Total Button then click on the Return button.
 Followed by
 ![]()
A Confirm Action window will appear when returning more than one item. If you wish to return all the items click on
the button labelled Yes.
Once you have clicked on the button labelled return your item(s) will appear in a new sales transaction window with the word “Return” next to each product description.
![]()
Press the payment type by which you wish to refund the customer. This will usually be card or paypal as you are still required to login to your ePayment provider to do the actual refund.
 or
or 
Two further buttons will appear below the Sales Transaction window.

The transaction can be left at this point if you are willing to refund your customer before you have received
back the products sent.
If you have already received the products back you can select the Returned button.
 Note: Once you have pressed the returned button that articles stock levels will be incremented ready for resale.
![]() A double orange & red arrow will appear next to the web transaction in the web panel and then disappear.
A double orange & red arrow will appear next to the web transaction in the web panel and then disappear.
To review this transaction again type in the web order number prefixed by a P into the transaction entry field. Two web receipts will now show in the web receipts window with different date and time stamps. The first will show the web transaction you despatched to the customer and the second will show the value you have just refunded.
Important Note: To fully credit the money owed to your customer you will now need to login to your ePayments Providers web page to process the refund to the purchaser’s credit card/account.
[su_divider]