
This document describes how to add new staff members to the Connect software and how to enter a swipe code.
Creating a Staff Member and Swipe Code
In the Back Office, click the big Staff icon at the top of the screen.

The Staff Management window will now open, press the ‘New’ icon to begin creating your new staff member
![]()
or double click on an existing record to open the details.
The staff window will open ready to create/update a staff member and assign a swipe code (required for stock take devices and enforce passwords for Till logins). You can also set which site to assign the staff member to should you have multiple sites. The last option is for ‘Status’, here you can set whether the person is a ‘Staff Member’ or ‘Leaver’. You should set the person as a leaver should they no longer work for your company, this will remove them from the login list on the Till screen.
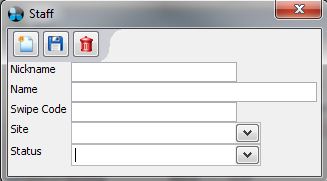
Once you have completed your details, press the ‘Save’ icon.
![]()
[su_divider]
How to Enforce Swipe Code must be Entered at the Till to Login
From the ‘Back Office’, click ‘Tools’ and select ‘Configure’.
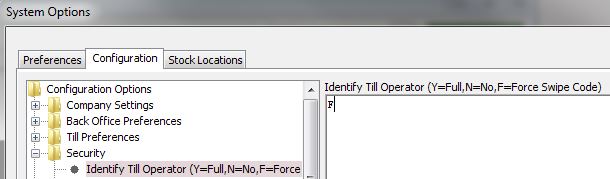
Now click the ‘Configuration’ tab.
![]()
Locate and expand the ‘Security’ folder. Click on ‘Identify Till Operator (Y=Full, N=No, F=Force Swipe Code). On the right hand side change the value to ‘F’.
Now click ‘Ok’ to save your changes, close any other windows and restart the Connect software for the changes to take effect. You will now notice that when you start the till backup that you have to enter the Swipe Code to login.
If you change the setting to ‘Y’ you will see the users names on the Till front and will just be able to click on them to login, no Swipe Code entry will be necessary.
[su_divider]