
What Are Tags?
Tags are a phenomenal and innovative development. Please take a little time to read this document to understand just how powerful they can be for your business.
Tags allow you to give a personality to any of your Articles, Customers or Suppliers. This personality could be about; who the article is suitable for (e.g. Mum), what colour it is, what age group it is appropriate for, what application is useful for (e.g. Formal evening out), in fact, whatever you want it to be.
Once you have tagged something, say an article, with a personality you can use it to group articles together, report on specific types of articles or find articles very quickly.
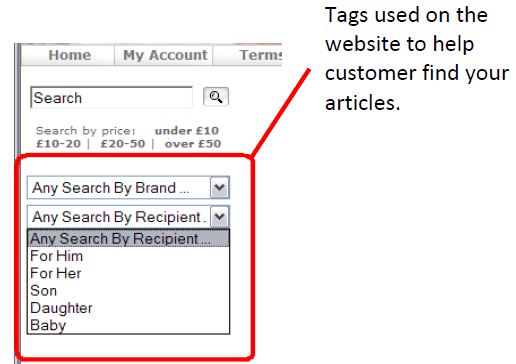
Tags also allow your online customers to find the right product on your website in the most effective way possible.
WHAT SHOULD AND SHOULD NOT BE TAGGED IN THE ACTIVE STOCK TREE/WEB BROCHURE:
You should only tag master products. Options should not be tagged at all, unless the options you are tagging are in options sets that are configured to display on the web site as “Show options as individual products”.
If you tag options, and then filter the Web Brochure using a tag filter, the tagged options will display. However, if you use the Quick Shop tag filter to filter the web site, the tagged options will NOT display because it will only find products (and NOT options). Although, the options WILL display if the options for the products are set to “Show options as individual products”.
[su_divider]
Where Can Tags Be Used?
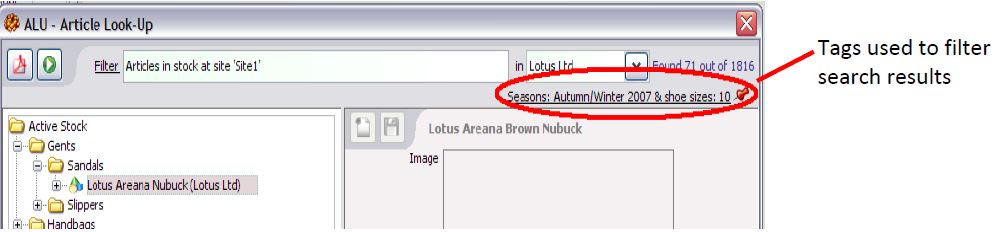
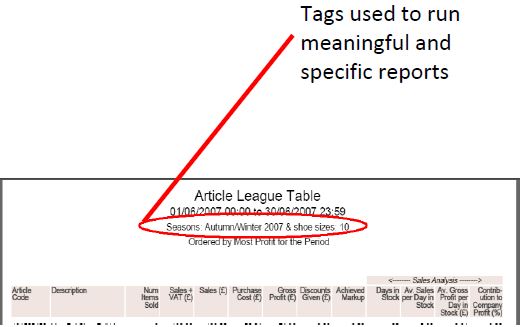
Any reports generated will pick up the currently selected tags which when used in combination with the filtering, gives an extremely powerful mechanism for analysing your stock, customer and supplier data.
[su_divider]
Tagging Examples
Here are some example uses for tags to stimulate some ideas for your own business.
Articles
- Identify Articles by season.
- Identify Articles by age range.
- Identify Articles by gender suitability.
Suppliers
- Identify Suppliers by the products they supply e.g. candles, clothing etc.
- Identify Suppliers by payments terms, Pro-forma, Account, Show Only.
- Identify Suppliers by speed of delivery.
Customers
- Identify Customers by gender: male, female
- Identify Customers who have accounts
- Identify Customers by suitability to certain product ranges for marketing purposes.
- Identify Customers by their personal needs, requirements, pets or children.
[su_divider]
How To Use Tags: Overview
1. Create your tags.
2. View your tags.
3. Apply your tags.
4. Use your tags.
[su_divider]
Extra Information
5. Functionality of the Tags window
[su_divider]
1. Create Your Tags
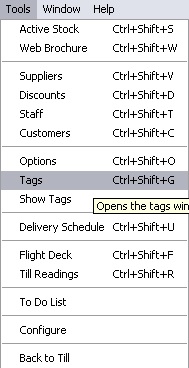
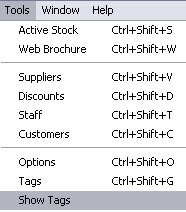
In Back Office, click on “Tools” in the windows menu bar and choose “Tags”.
The Tag Sets window will appear. Click on the “New” Icon
![]()
The Tag Set window will appear.

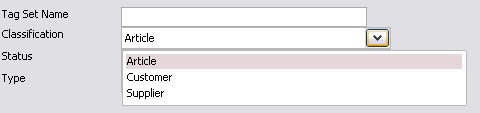
Enter a name for your Tag Set in the field labelled “Tag Set Name”. i.e. Price Range
Click on the down arrow to choose the type of tag you want to create.
Activate the tag. Your tags will normally be active, however if you wish to make the tag inactive for a while you can do that.

If you want to make the tag appear on your website, then select it in the “Type” section.
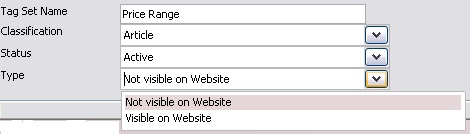
‘Save’ tag set
![]()
Now create your tags. Click on the New Icon
![]()
The Tag window will appear. Enter the first tag in the field labelled “Tag”. (i.e. Under £5)
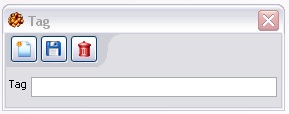
Click on the “Save” Icon
![]()
Continue entering all required Tag Names. This will create a list of all tags in the Tag Set Window.
When all Tags have been created, click on the red cross in the top right hand corner of the Tag Window, Tag Set Window and Tag Sets window to return to the Back Office.
![]()
Now close and open Connect to complete the creation of your new tags. Close and restart Connect Software.
[su_divider]
2. View Your Tags
Click on “Tools” in the Windows menu bar and choose “Show Tags” within the Back Office of the Connect Platform.

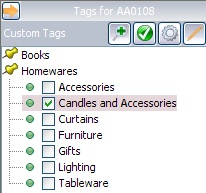
The Tags Window will appear on the right hand side of the Back Office window.
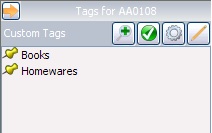
Whichever article / customer / supplier you select you will only see tags that are appropriate to that item.
When the Supplier Window is opened the Tags window will show the available Tags which can be applied to Suppliers.
When the Customer Window is opened the Tags window will show the available Tags which can be applied to Customers.
When an article is selected in the Active Stock Window the Tags window will show the available Tags which can be applied to an Article.
[su_divider]
3. Apply Your Tags
Ensure that you have set Connect to Show Tags
Open one of the following windows to which you wish to apply Tags: Active Stock, Customers or Suppliers.

Highlight an Article, Customer or Supplier to which you wish to apply a Tag.
![]()
The Tags window title will change to show:
The Article Code;
The Supplier Name;
The Customer Name.
The Tags window will show all available Tags that can be applied to Articles, Suppliers or Customers.

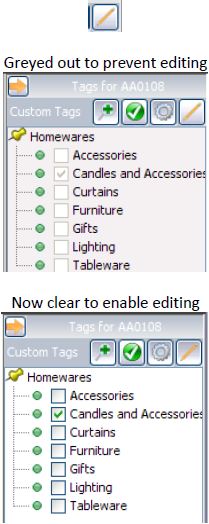
To tick the boxes next to the tags, you need to select the “Edit” icon. This will allow you to tick and un-tick tags for each article, supplier or customer.
![]()
Click on the checkboxes next to the available Tags which you wish to apply.
[su_divider]
How To Filter The Stock Tree Using Tags
Open the “Active Stock” Window.

Additional words can be added to the filter field. i.e. Candle
Click on the “Tag” Icon under the Reorder Button.
![]()
The Tags for Article Filter window will appear.
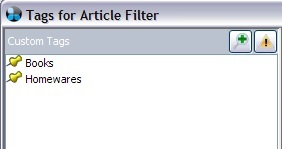
Click on the checkbox next to the Tags that you wish to filter the Stock Tree by. Click on the “Apply” Button to filter the stock tree.
[su_divider]
4. Use Your Tags
How to Filter Suppliers/Customers using Tags
Open the “Supplier/Customer” Window.
Click on the “Tag” Icon (under the filters)
![]()
The Tags for Supplier/Customer Filter window will appear.
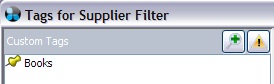
Click on the checkbox next to the Tags that you wish to filter the Suppliers/Customers by. Click on the “Apply” Button to filter the stock tree.
5. Functionality Of The Tags Window
The Tags window shows all available Tags which can be applied to sets of data. At the bottom of the Tags window there are three check boxes:
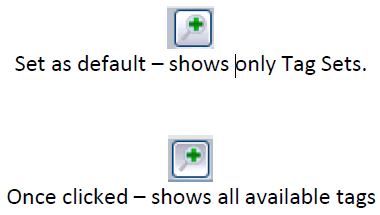
“Expand All” – by default, this icon’s background is white and grey (white at the top) and shows a collapsed list of all available Tag Sets.
Once clicked the top of the background turns grey and you will see an expanded list of all available Tags.
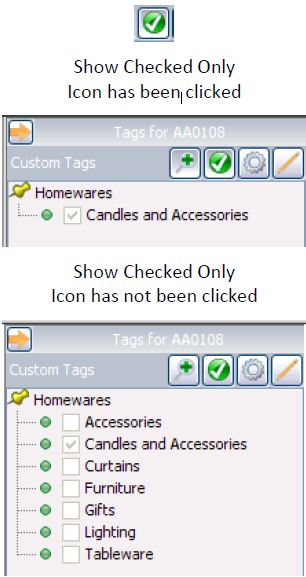
“Show Checked Only” – if you have lots of tags it may be useful to only show those that are already selected.
If you select multiple items (articles / customers / suppliers) then this is a group.
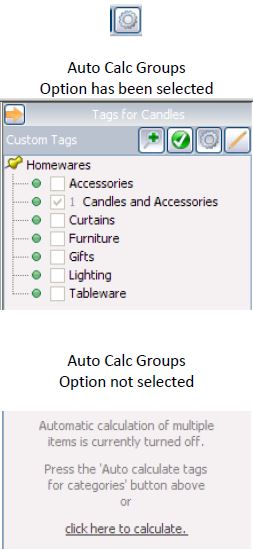
Connect can show whether the group of items you have selected have tags or not by clicking the “Auto Calc Groups” icon.
“Auto Calc Groups” – by default, this icon is not selected and therefore does not calculate the number of items applied to each Tag. If clicked, the number of items applied to each Tag will be shown.
The following message will appear in the Tags window if Auto Calc Groups has not been selected.
‘Automatic calculation of multiple items is currently turned off. Tick Auto Calc Groups below to turn it on or click here to calculate.’
Clicking on this message enables you to view the number of items applied to a Tag on a one-off basis.
We suggest turning this on. However if your computer starts running slowly (this can take a lot of computer power) then turn it off.
To tick the boxes next to the tags, you need to select the “Edit” icon. This will allow you to tick and un-tick tags for each article, supplier or customer.
[su_divider]