
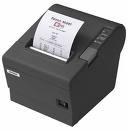
It can be useful to have a USB receipt printer; this allows you to print transaction receipts from any machine with Connect software installed, including laptops.
Installation
Open your web browser and navigate to the URL below so that the drivers can be downloaded to your computer for the Epson USB receipt printer.
Click ‘Next’ through to the end of the installation.
http://www.irconnect.co.uk/Download/ epsonusbprinterdriver407.exe
Plug in the Epson USB receipt printer to the mains power and USB port on your computer.
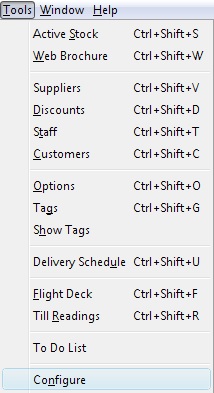
Start Connect. Open the back office, select the ‘Tools’ menu then ‘Configure’.
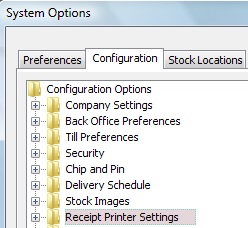
The ‘System Options’ window will open.
Select the ‘Configuration’ tab then open the ‘Receipt Printer Settings’ folder.
Set the ‘Use ESC-POS Printer’ option to ‘N’
Set the ‘Use Java-POS Printer’ option to ‘Y’
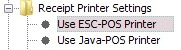
Set the receipt printer COM Port to COM1
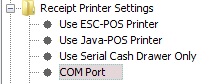
Click ‘OK’
![]()
Shut down and restart Connect. You are now ready to print.
[su_divider]
Personalisation of receipts
Create and save your company logo as ‘receipt-header.bmp’.
This image should be set to 492 x 242 pixels.

receipt-header.bmp
Using Windows Explorer navigate to C:\IR Connect\Live\images\print and save your company logo.
Start Connect. Open the back office, select the ‘Tools’ menu then ‘Configure’.

The ‘System Options’ window will open.
Select the ‘Configuration’ tab then open the ‘Receipt Printer Personalisation’ folder.
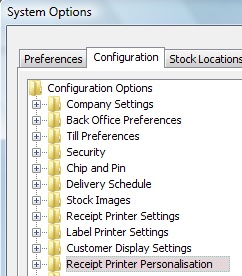
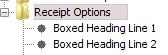
Open the ‘Receipt Options’ folder and remove any text from both the ‘Boxed Heading Line 1’ options and the ‘Boxed Heading Line 2’ options.
Click ‘OK’
![]()
Shut down and restart Connect. You are now ready to print.
[su_divider]
Personalisation of gift vouchers
Save your gift voucher logo as ‘gift-voucher-header.bmp’.
This image should be set to 492 x 242 pixels.
gift-voucher-header.bmp
Using Windows Explorer navigate to C:\IR Connect\Live\images\print and save your gift voucher logo.
[su_divider]