
Before we get to looking at how Stock can be managed in IR Connect it may be helpful to talk a little about how to use the keyboard and mouse to move products from one folder to another. If you are already familiar with this process then skip to the next section entitled ‘ARCHIVING STOCK’.
[su_divider]
How to ‘Drag and Drop’ Products using the Shift Key
To select multiple products, left click the first product, hold down the shift key and while still holding down the shift key left click the last product. This will highlight the first product you clicked on and the last product you clicked on, and all the products in-between. Now that the products are highlighted we need to move them to your chosen location. Left click the mouse over the selected products holding the left mouse button down the whole time, move the mouse pointer over the destination folder and release the left mouse button. This will move the selected products into your chosen destination folder.
[su_divider]
How to ‘Drag and Drop’ Products using the Ctrl Key
Alternatively, if you need to select multiple products that are not contiguous (i.e. not next to each other). Left click the mouse on the first product, hold down the ctrl key and while still holding down the ctrl key left click on each product that you would like to highlight. Now that the products are highlighted we need to move them to your chosen location. As before, left click the mouse over the selected products holding the left mouse button down the whole time, move the mouse pointer over the destination folder and release the left mouse button. This will move the selected products into your chosen destination folder.
[su_divider]
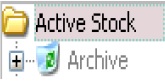
Archiving Stock
There may come a time when certain products in your stock tree are no longer needed. For example, you may be a Fashion Retailer who wants to remove last seasons clothing range from the stock tree. The system will NOT allow you to remove a product from the ‘Active Stock’ tree if there are sales against it. Even if you could delete the products from the ‘Active Stock’ tree, why would you want to? There will be useful sales data and statistics stored against those products and if you could remove the products you would lose all that statistical data along with it.
So what can you do? Well, you can archive those products by creating some Archive Groups. This means that the products will be out of the way and not clogging up your Active Stock tree and at the same time you will retain all the statistical data that has been collected against those products.
Tip: Instead of creating an Archive Group in the Root of your Active Stock tree try creating an Archive Group in each of the Root categories and placing the products you want to archive in their corresponding Archive Groups. If you do this it will allow you to generate more accurate “Summary by Category” reports against your Root categories.
To create an archive for products, go to your ‘Active Stock’ tree in the Back Office.
Right click using the mouse on your chosen folder in the ‘Active Stock’ tree.

Choose ‘New’ from the menu that appears, follow across and select ‘Archive Group’.
You will see a new icon (looks like a recycle bin) appear in the Active Stock Tree with the text “new group” highlighted. Type in the name you want to give the new Archive Group and press the enter key on the keyboard to confirm it. The text will appear in italics until you save your changes.
Drag and drop the products you wish to be archived into this group. Remember to click the save icon (looks like a floppy disk) to save your changes. If you are unsure about how to drag and drop products please refer to the instructions above, ‘How to Drag and Drop Products using the shift key’ or ‘How to Drag and Drop Products using the ctrl key’
[su_divider]
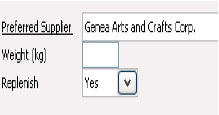
Adding more than one Supplier to a Product
You may have multiple suppliers for exactly the same product.
To add extra suppliers to a product, left click on the product in the ‘Active Stock’ tree so that it is highlighted.
In the right-hand side window left click ‘Preferred Supplier‘. This will display the ‘Article Supplier’ window. You will see your current supplier in the drop down box next to where it says ‘Supplier‘. Left click on the ‘new’ icon in the top left-hand corner of the Article Supplier window. Then select your other Supplier for this product from the ‘Preferred Supplier’ drop down menu by clicking the down arrow to the right of the ‘Preferred Supplier’ box. If the supplier you are looking for is not in the list then you will need to create a new supplier. To do this, close the ”Article Supplier’ window and left click the ‘Suppliers’ icon near the top of the screen and then refer to the appropriate helpsheet or User Manual if you need further help.
You may wish to enter details into the rest of the fields, i.e. ‘Suppliers Description’ before clicking the ‘Save’ icon.
You have now successfully added a new Supplier to your chosen product. You can confirm this by checking the ‘Preferred Supplier’ drop down menu by clicking the down arrow to the right of the ‘Preferred Supplier’ box.
[su_divider]
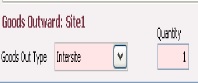
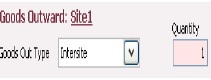
Transferring Goods Between Locations
There may be occasions when you wish to transfer the stock from one site to another. For example, your stock for a particular product may be assigned to ‘Site1’ within IR Connect. You might then require this stock to be assigned to ‘Site2’ to reflect a change in the physical location of the products moving from one physical site to another.
To transfer stock from one location to another, go to Back Office, click “Active Stock” and to the item that you would like to transfer then click on “Goods Out” at the bottom left hand side of the window.
Next to the title “Goods Outward” choose the site (i.e Warehouse – this is underlined).that you want the item to be transferred FROM. Choose the “Goods Out Type” to be “Intersite”, put in the quantity of the item and press the “Enter” key. This will show as a goods out in the table below
Go to your “Goods In” window and again, choose which site (i.e Store – underlined), which is where you want the item (s) transferred TO. From the drop down menu choose “Intersite”, enter the quantity and press the “Enter” key on your keyboard.
[su_divider]
Stock is in Different Locations, why?
When you complete a ‘goods in’, ensure that you enter the accepted stock quantity to the correct site.
You can have multiple stock locations and these can be anywhere you choose. For instance; your main site, warehouses, lock ups, or even your stock cupboard.
Quantities of stock can be held against these locations, when the stock is moved physically the movement should be replicated on the Connect Platform.
[su_divider]
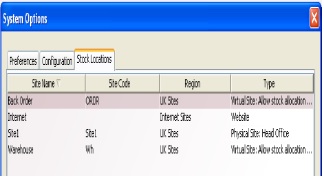
Back Order Fulfilment & Alocation
As articles are added to a Sales Transaction, availability of stock is automatically checked for allocation. If an article is added to a sales transaction and there are none available from the primary stock location a stock availability window will appear showing all sites where that stock is available.
Double click on the site labelled Site1.
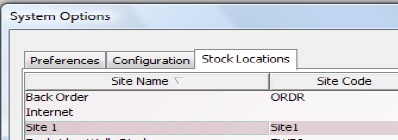
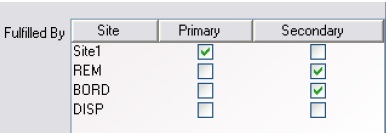
The Sites window will appear. In the bottom half of the window you will notice that there are a list of sites in the section labelled Fulfilled By, each with a checkbox.
Site 1 will always be the only Primary fulfilment site.
For each site click on the checkbox in the column labelled Secondary where you would like sales to be fulfilled from, when there is no stock at the primary site.
Click on the red cross in the top right hand corner of the Sites window to close it.
![]()
Click on the OK button in the System Options window to close it.
![]()
[su_divider]
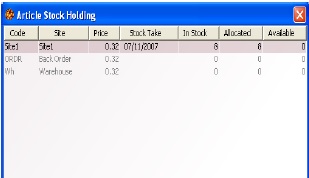
Allocated Stock is Still Showing as Available, why?
If a customer part pays or pays a deposit against a transaction, the stock will be allocated although not taken from the stock amount.
As soon as the transaction has been paid in full the stock levels will show that the stock has been allocated and removed from stock.
[su_divider]