
Changing Meta-tag data
Introduction
Intelligent Retail websites have a powerful suite of SEO tools built in. Some of these automatically optimise your product names for the search engines. Others are there to allow elements of the automated optimisation to be controlled by you and this is detailed here. Other tools allow very specific and controllable manual optimisation of words and phrases down to individual page level.
This document is designed to give your Web Manager access to set up some of the automated SEO and to make manual changes to the Meta Tag data on your website. Meta Tag data is used by search engines to understand what the site is about and is one of many elements used to optimise a site to obtain higher listings for certain key phrases.
[su_divider]
Section 1: how to change the meta tag settings: the website title, meta keywords and description
Go to the Back Office and open the Multichannel Centre from the Channel Centre.

Click on the underlined word Website to open the website settings.
![]()
Populate the fields.
Description
Describes the website so that those customers that have more than one website running from Connect can distinguish between them. For example, this description appears on the Till screen next to Web Site dropdown so you can select which orders you would like to see.
Title
To change the website title, type in the phrase you would like in the ‘Website Title’ field. This will apply to all pages on your website. This title will then be automatically appended to optimise deeper pages throughout your website as follows:
a) For all product pages, this Title will be appended at the start of the title with the name of the product as well. For example a product called “Yellow Sunlamp” will have the title “Yellow Sunlamp + Website Title”.
b) For all static HTML pages, the filename of the HTML page will be appended to the title. For example a page with filename “more-information-on-yellow-sunlamps.html” will have the title “More information on yellow sunlamps + Website Title”. Notice the hyphens are replaced with spaces.
Meta Keyword Prefix
Type in the phrase you would like in the Meta Keyword field. This will then apply to pages across the whole site although it can be overridden or added to in order to tune individual pages. This can be done automatically (see below) or manually (see the section ‘HOW TO MANUALLY CHANGE META TAGS FOR ANY PRODUCT OR CATEGORY PAGE’).
Auto Suggest Meta Keywords
This simplifies the optimisation of your website. By turning it on, your website will automatically create individual Meta Keywords for each of your product and category pages. The Keywords are created as follows:
Meta Keyword = Meta Keyword Prefix + Category names + product name
![]()
Auto Suggest Meta Description
This simplifies the optimisation of your website. By turning it on, your website will automatically create individual Meta Description for each of your product and category pages. The description is created as follows:
Meta Description = The first 250 characters of the product Full Text.
Once the changes are complete you will need to go to the Multichannel Centre and do a Full Upload to make the changes visible.
You can even be more specific about Meta Tags by manually appending or overriding the tags generated above. This can be done on a page by page basis giving a very high level of control over the information that will be seen by search engines.
![]()
[su_divider]
Section 2: how to manually change meta tags for any product or category page
Follow these steps to give your Web Manager access to change the Meta Tag data.
Ask the Web Manager to go to your website and create an account for themselves.
Open their account in the Web Management Area. Click on the ‘Access to Website’ box and change their access to ‘Full Admin Access’. Then press ‘Save’.
Go to the Back Office and open the ‘Customers’ Window.

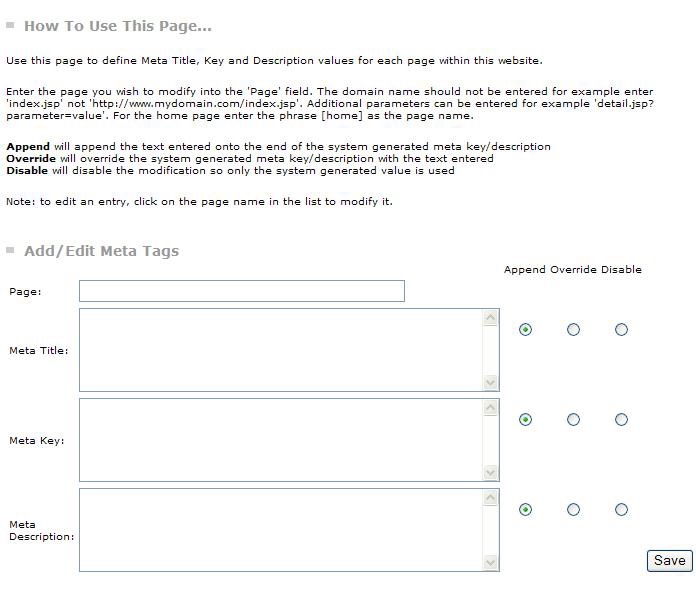
Your Web Manager can now login to the website again. On the Welcome screen they will be given a new option called ‘Meta Tag Admin’. If they click on this they will be taken to a page as shown below.
By following the instructions on the page, any of your web pages can have Meta Tag data altered.
Once the changes are complete you will need to go to the Multichannel Centre and do a Full Upload to make the changes visible.
[su_divider]