
Price Book is a module that allows you to charge different prices against customers based on specific products. The product pricing can be set up as a percentage, set price or quantity based. This is controlled on a list or per product basis.
STEP 1: Price Book Setup
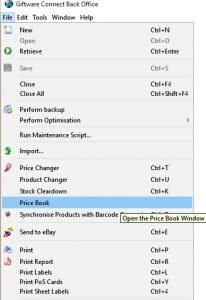
1. From the Back Office. Click on File > Price Book
(Note: Price Book is an add-on module in Connect. If you don’t have it turned on, please get in touch to discuss.)
2.To Create a new group, click on the “new” icon
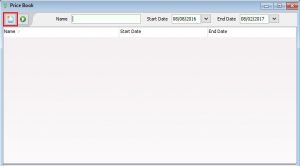
3. Fill in the following information which is relevant to this price book:-
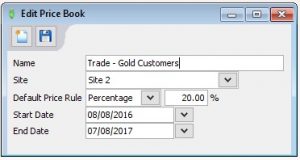
- Name – This is the name that will appear in the system tags of the stock and customer modules. This is also the name that will appear in the till operation.
- Site – Specify to which site this is specific or select [All]
- Default price rule – Set the default value you would like to apply to the majority of the products in the book. You can then override the minority on each individual product accordingly.
- Start date – Set a start date to activate
- End date – Set an end date when it is to expire.
Click Save and close all windows.
You have now created a price book which activates as a system tag in both the Active Stock and Customer modules.
[su_divider]
STEP 2 : Product Selection
You are able to control which items are on the price book, and which ones are not. This is the next step you need to take after creating the price book.
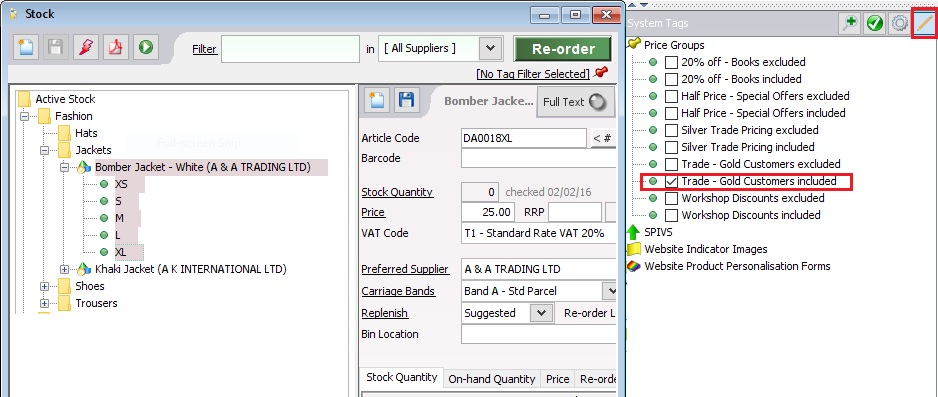
1.Click on Active Stock, pop out the Tags Window.
In the system tags the Price Book will now display under Price Groups under the same name as was given when setting it up.
Important: The Price Groups System Tag is intuitive in the following ways:
- If you tag one or more products as “Excluded” the rest of your products will be automatically “Included” into the price group.
- If you tag one of more products as “Included” the rest of your products will be automatically “Excluded” from the price group.
- The included and excluded allow the shortest clicks to achieve the most scenarios. So everything can be included (by default with no tags needed) and then just a few excluded, or visa-versa. The excluded overrides the included, so you could re-use an existing tag for a range of products, then excluded a few that you don’t want.
- You can multi-tag a product which may belong to several Price Books
2.Highlight/Select the required products from the Active Stock window and then tag the products against the relevant Price Book(s) the way you want to use them.(Reminder: Don’t forget to click on the pencil to allow editing and click again to save your changes)
[su_divider]
STEP 3: Price Book Product Criteria
After all relevant products have been tagged, when you return to the Price Book module (ie. File > Price Book). Double click on the Price book was created which now shows items in the “Included Products” and “Excluded Products” tabs that reflect the choices you made. From here you are able to edit information on each individual item you have in the “Included Products” tab only.
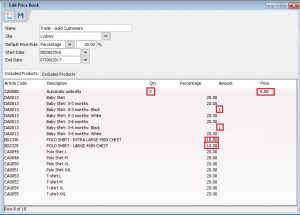
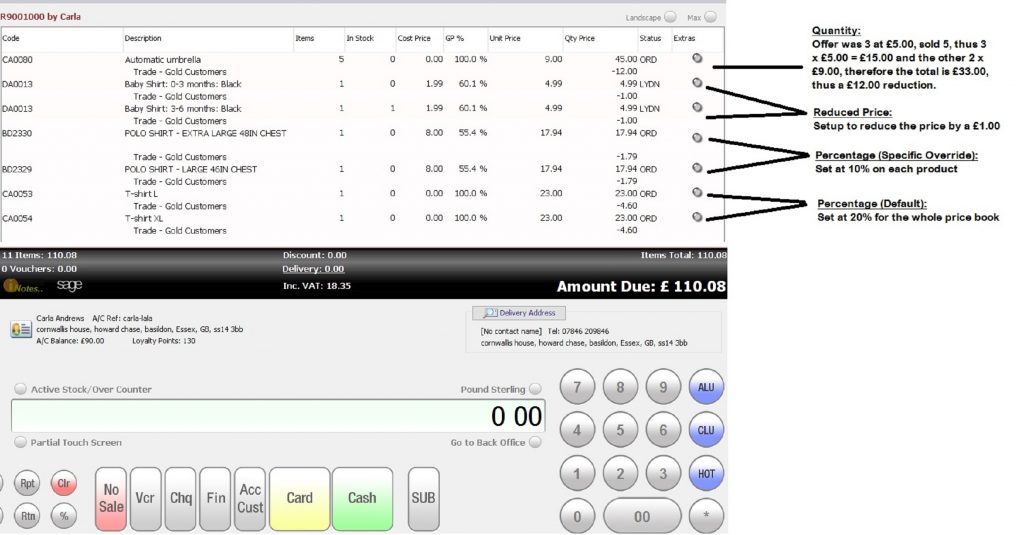
- Qty: Use this column to set the maximum number the customer can buy of a particular product in one transaction and receive the discount specified, ie. If set to 3 and 10% off, if the customer buys 4, the first 3 will be 10% off, the 4th will be full price.
- Percentage: This is the percentage column and can also be overridden from the default set against the price book
- Amount: Instead of using a percentage, you can give a fixed monetary amount reduction off each item
- Price: Instead of using percentage or amount, you can set a specific unit price.
[su_divider]
STEP 4 : Customer Setup
Important: Customers must be linked to Price Books and assigned to transactions at Till mode to receive the discounts setup in the Price Books, otherwise the pricing won’t work on the till.
1.From Back Office > click on Customer module

2. Click on the customer(s) in your list you wish to apply the price book to.
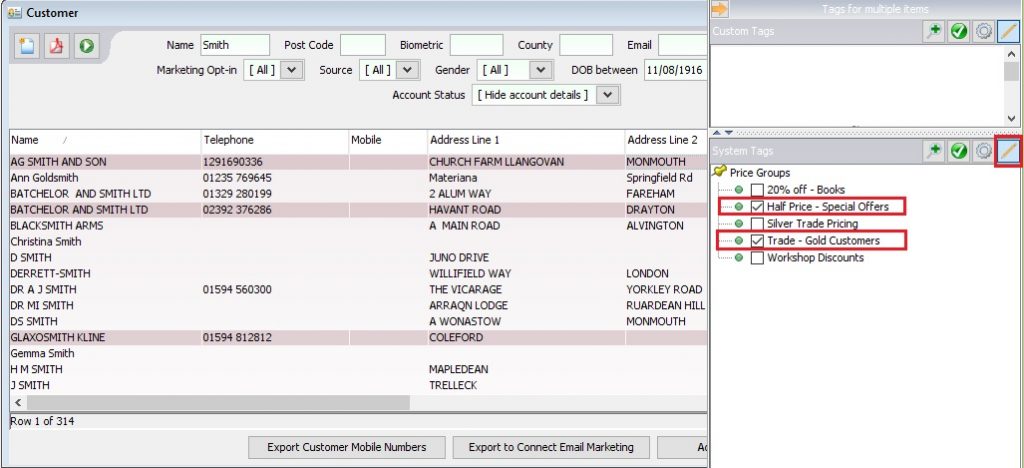
3. Open the System tags, Price Groups, tick the price book to apply to the specific highlighted records to. Note: You can have a customer belong to multiple price books, as at point of sale the till operator will be prompted by pop up window to select which Price Book to use.
4. That’s it! As long as you are assigning the customers you selected to the sales on the till, they will receive this price structure you have set up.
[su_divider]
STEP 5: Till Operation
Important: For a Price Book to be effective the customer needs to be assigned to the transaction for the discounts to take effect.
Below is an example of how this works:-
BEFORE:
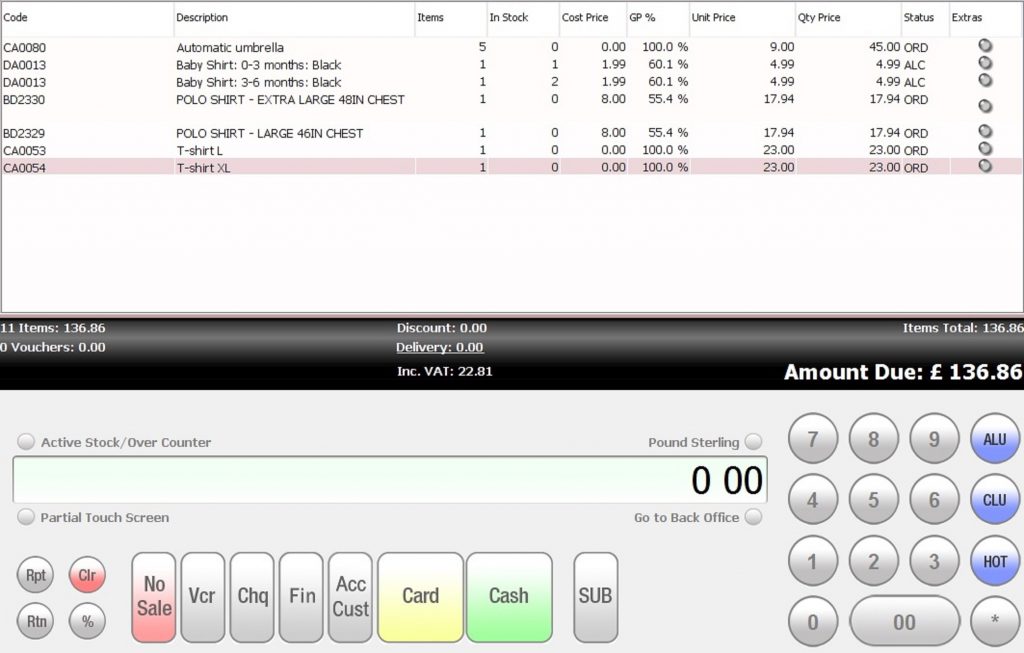
Assign the Price Book customer via the CLU button …
PROMPT: (Till operator to select the relevant Price Book)
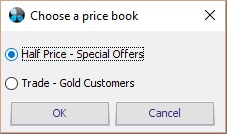
If customer has two price books setup then a prompt will be available for the till operator to select. Click on OK to continue.
AFTER:
[su_divider]