
This document will introduce you to some of the key areas within the Connect Platform enabling you to get the most out of your software from the point of installation. This document should be used in conjunction with the Back Office Manual if further information is required.
- Supplier Creation
- Renaming Categories and Hot Keys
- Creating Sub Groups
- Creating Options
- Creating Articles
- Adding Stock Quantities
- Printing Barcodes
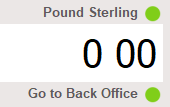
How to get to the Back Office from the Till
From the till click on the button to the right of the label Go To Back Office placed under the transaction entry field. The Back Office window will appear.
Supplier creation
All products on the Connect Platform have to be associated to a Supplier and therefore Suppliers must be created before their products.
Click on the button labelled Suppliers at the top of the window. The Suppliers window will appear.

Click on the New Icon
![]()
A further Suppliers window will appear. Enter details in all fields and use drop down lists where appropriate. Some fields are mandatory.
Once you have completed all relevant fields click on the Save Icon.
![]()
Continue creating all Suppliers using steps 2 to 4 above.
Renaming top level categories and associated hot keys
The Connect Platform enables you to categorise your stock under top level categories. Each of these categories can have multiple unlimited sub categories.
These top categories should group your products at the highest level. They are shown every day on the stock tree and when you cash up where you will see the total takings broken down across them. Reports are available for further information about sales of products within sub categories. It is suggested that you refrain from categorising your products by Brand or Supplier as you can report against these using reports.
Each of the categories has a Hot Key associated with it. A Hot Key is a way to quickly set cash value against a part of your business (used as a last resort to make a sale). Each Hot Key must be renamed the same as the highest level category.
Click on the button labelled Stock at the top of the window. The stock window will appear.

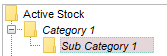
You will see a tree structure with the top heading of Active Stock. Under which are nine categories.
Right click on one of the categories. You will see a list of actions. Choose Rename.
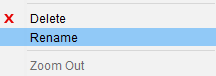
A box will appear around the chosen category. Back space the cursor to remove the given name and type your new chosen name for the category. Press the enter key on your keyboard.
![]()
Your new category name will appear in italics until the saved. Click on the Save Icon.
![]()
Open the category group by either double clicking on the yellow folder symbol or clicking on the plus symbol next to the folder.
![]()
Click on the Article labelled Category ‘X’ Hot Key. Follow steps 3 to 5 to rename the Hot Key. The name must be the same as its associated category.
Create sub groups
You can now create as many sub groups as you require under each of the top level categories to further categorise your products.
e.g. Top Level Category labelled Cards & Gift Wrap would naturally have two sub groups of Cards and Gift Wrap. Gift Wrap could then be further categorised as flat wrap, ribbons, bows, gift boxes etc.
Click on one of the top level categories that you have renamed.
![]()
Click on the New Icon.
![]()
A new group will appear under the category you’ve highlighted. Back space the cursor to remove the given name and type your new chosen name for the sub group. Press the enter key on your keyboard.
Your new category name will appear in italics until the saved. Click on the Save Icon.
![]()
You can continue creating further sub groups for your categories by following steps 1 to 4 above.
[su_divider]
Creating Options
Stock items (Articles) may have attributes. i.e. a T-Shirt may come in different colours and/or sizes. E.g. DKNY T-Shirt would be the generic article and it would have the attributes of Red, Blue and Black and also in sizes of Small, Medium and Large.
The Connect Platform treats these attributes as options. If the options you create are generic then they will apply to more articles i.e. Colours – Red, Blue and Black rather than T-Shirt Colours – Red T-Shirt, Blue T-Shirt and Black T-Shirt. Therefore if you then create an article of Candle the colours of red, blue and black will still apply.
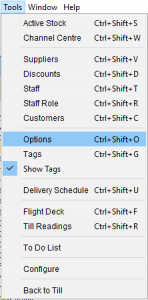
Click on Tools in the windows menu bar and choose Options from the drop down list.
Option Set Window will appear. Click on the New Icon.
![]()
A further Options Set window will appear. Enter a name for the Option Set you wish to create. i.e. Colours.
![]()
Click on the New Icon.
![]()
The Option Window will appear. Enter an option type i.e. Pink.
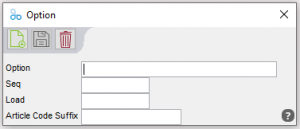
Click on the Save Icon.
![]()
Continue to add colours by entering the Option and clicking on the Save Icon.
When you have entered all the option types you require, shut each of the Option windows using the red cross button in the top right hand corner of each window.
![]()
Creating articles
Articles are your physical items of stock. Each item of stock is unique and therefore can only appear on the stock tree once.
The Stock window is split into two panels. The left hand panel is for the creation of Categories and Sub Groups. The right hand panel is for the creation and information held about an article.
Click on the Category (in the left hand panel of the Stock window) in which you want the article to appear.
Click on the New Icon in the right hand panel of the Stock Window.
![]()
The Supplier Article window will appear.
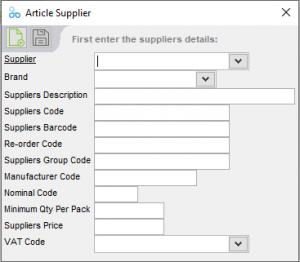
Choose the Supplier of the product you are creating using the drop down list to the right of the field labelled Supplier.
The drop down list will contain all the Suppliers which you have already created.
Enter the description of the product labelled in the field labelled Suppliers Description.
This description will appear on the till receipt.
Enter the product code in the field labelled Suppliers Code.
E.G. RNC12356
Scan or type the barcode into the field labelled Suppliers Barcode.
E.G. 0000001372618
Enter an alternative code if supplied by the Supplier in the field labelled Reorder Code.
If no alternative given, leave blank.
Enter a merchandising group name or range name in the field labelled Suppliers Group Code.
If you have no range name, leave blank.
Enter the lowest denominator in which you can buy the product you are creating in the field labelled Minimum Qty Per Pack.
Enter 12, If you have to buy in packs of 12. If you can buy this product in singles, enter 1.
Enter the Nett price (excl VAT) charged by the Supplier for the product you are creating in the field labelled Suppliers Price.
e.g. 1.20
The field labelled VAT Code will be automatically populated with the VAT code that you have attributed when the Supplier was created.
e.g. T1 – Standard Rate VAT.
Click on the Save Icon within the Article Supplier window.
![]()
Once you have clicked on the Save Icon, further fields need to be completed (behind the Article Supplier window in the right hand panel of the Stock window).
If the panel is obscured, move the Article Supplier window by clicking on the window title and drag with the mouse.
Each created article is given a unique Article Code.
This number can be written on a pricing ticket to identify the stock item at the till if no barcode is available.
If you wish to keep a certain number of these products in stock enter a number in the field labelled Re-order Level.
E.G. 6
A suggested retail price will appear in the field labelled Price.
NB. The suggested retail price is based on the calculation between the Nett Suppliers Price and the Mark-Up set in the Configuration Options.
You can change the retail price by clicking into the field labelled Price. Removing the suggested price and entering the price at which you wish to sell the product. e.g. 2.50.
The field labelled VAT Code will be automatically populated with the VAT code that you have attributed when the Supplier was created.
If you wish this Article to have a different VAT Code click on the down arrow to the right of this field and choose an alternative VAT Code.
You will notice that your article has appeared in the left hand panel of the Stock Window. It will remain in italics until you click on the Save Icon in the top left hand corner of the Stock Window.
Note:
- By default, Connect checks for duplicated product names on entry of every new product.
- Once the Connect inventory exceeds 30,000 products (inc. options) then this feature is automatically turned off to maintain speed of product entry.
- The customer then can add one or more products, then simply right click on the stock tree folder (can be root folder for all) and choose “Check and Fix duplicate article names”.
![]()
You can at this point in article creation, add a photograph, full text and delivery weights/bands. Please see the Back Office Manual for further details.
[su_divider]
Adding Options (Attributes) to Articles
Choose and highlight the article in the stock tree to which you wish to add options. ie. Candle, which is available in three colours.
Right click on the product. Choose Add Options from the menu.
The Add Options Window will appear showing a list of the Option Sets that you have created.
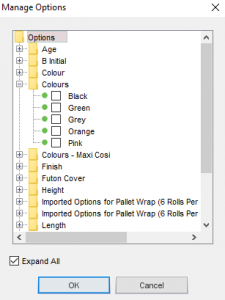
Click in the checkboxes where you wish to add the option.
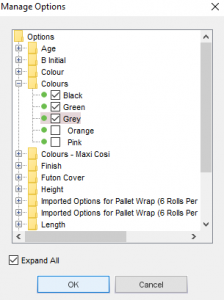
Click on the OK button.
![]()
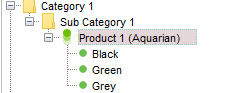
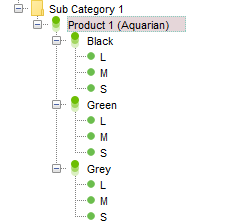
You will notice that the article now has the options that you selected.
You can add more than one option type at a time to an article. i.e. Colour and Size.
[su_divider]
Adding Stock Quantities
The Connect Platform enables you to add stock quantities in two ways:
1. Stock Take – the suggested way for initial stock figures where stock is already in place prior to installation of the system.
2. Goods In with a reason code of Purchase – for stock which has just been purchased and has arrived as a delivery.
Click on the circle to the left of either the label Stock take or Goods In. These are situated at the bottom left hand side of the Stock Window.
![]()
Click on and highlight the article to which you wish to add stock quantities (in the left hand panel of the Stock window).
If Stock take has been chosen a new field will appear in the right hand panel.
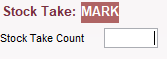
Enter the number of€ articles in the field labelled Stock Take Count.
e.g. 1
If Goods In has been chosen new fields will appear in the right hand panel.
![]()
Enter the number of articles in the field labelled Accepted.
e.g. 1
Continue entering stock quantities by either method by either moving to another article by clicking with a mouse or using the up and down arrows.
NB. If your article has attributes/options add the stock quantity to the option rather than the generic article i.e. Colour/Size level.
[su_divider]
Printing Barcodes
If you have had a barcode printer installed you can now created barcodes.
Click on and highlight the article you wish to print barcodes for (in the left hand panel of the Stock window).
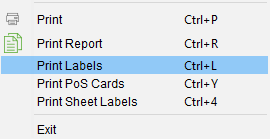
Click on File in the windows menu bar in the top left hand corner of the Connect Window.
![]()
Choose ‘Print Labels’ from the drop down list. The Label Printing Options Window will appear.
Click on the circle to the left of the label ‘Only Selected Rows’.
![]()
Using the down arrow to the right of the field labelled Which Labels?, choose the correct labels and size.
![]()
Click on the circle to the left of one of the possible options under the heading of How Many. This will allow you to choose the number of labels to print.
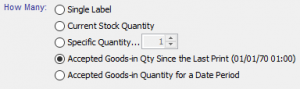
Click on the button labelled Print Labels.
![]()
[su_divider]