
Access – Log On
- URL: yourURL/editor/login
- username: editor@intelligentretail.co.uk
- password: upload password used in Connect
Basic Skills, Navigation and Icons Explained
- This will work on any web browser, ie. Edge, Chrome, Safari, Mozilla Firefox and it does not need to be done on a machine which contains Connect.
- Before you start editing ensure you have your website page open in another tab as any changes saved are automatically visible when refreshed, this is how you will view the changes made.
- General Icons –
 – Visible on top left used to expand the left menu hidden or not.
 – This is the search icon click on it to activate the search function. Visible on the top right on most pages.
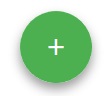 – This is used to add any new files or items relating to the menu option you are in. Visible on the bottom right on most functions
 – Save icon. Use this to save any changes made. Each save is time stamped and stored forever to be used should you need to restore to a specific point in time. (See below for more detail). Visible on the top right on most pages.
 – Visible on the top right on most pages. Allows you to:-
- Switch Editor – This allows you to switch between the mode of Content (Elements view) or Code (HTML view), refer to next point for more details.
- Undo – Revert back the last action
- Redo – Repeat last action
- Restore – If you have made an error or need to restore to a point in time
 or
or  – This is used to edit any item. Visible on the right of required element. Click on it to activate edit mode. Once you are in edit mode you will be offered the following choices:-
Edit Content
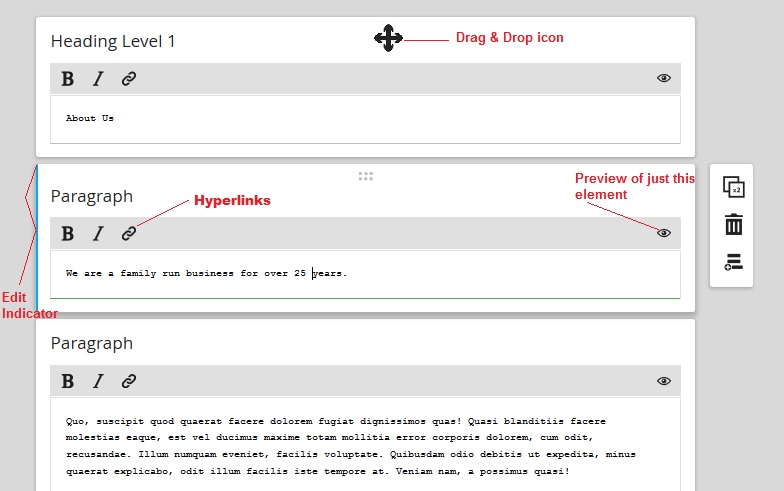
Content on pages is added by means of different types of elements, ie. paragraph, headings, images, label, input, etc. and it looks like this:-
You can do the following:-
Edit – Click on the requirement element and make your changes, you will notice which one you are on by the blue line on the left (refer to image above). Here you can amend the text by typing
Add – Click on the icon![]() and select the relevant element type you would like to insert.
and select the relevant element type you would like to insert.
Duplicate – Click on the element you want to duplicate and click on the icon![]() . This will create a duplicate of the required element, adjust accordingly.
. This will create a duplicate of the required element, adjust accordingly.
Move Position – Click on the element you want to move and the you will notice the double arrow cross drag handle icon ![]() , hold the mouse down and drag the element to the are you would like and release the mouse to place in position.
, hold the mouse down and drag the element to the are you would like and release the mouse to place in position.
Delete – Click on the element you want to delete and click on the icon![]() .
.
Save your changes – Click on the Save icon.
Edit Code
This is best left to those who know HTML well, but if you are a HTML novice then the general rule here is that any text that is:-
‘black’ font is the text which can be changed and visible on front end of website, stay within in the arrows to > < (Important: Do not erase the arrows)
‘red‘ font text is variables, these can be changed if needed.
‘blue‘ font is part of HTML code, only touch if HTML expert/confident.
‘green‘ font is part of HTML code, only touch if HTML expert/confident.
For the above to make sense open a static page to view the details, ie. contactus.html found under Files menu option.
- Templates – A template may have been designed by the web design team so it makes it easier or give you a head start when creating similar type files you can select this template to use as a basis. This option is available when creating new pages or in the Edit Content mode.
MENU EXPLAINED
Files
This section will list all pages that are used on the website, with the exception of static, ie. pages with extension .irs, refer to Pages section below for these for more information.
Editing Functions Available:-
- Edit an existing file:- Scroll down or use search function to find the name of the required file. Once found click on the cog black wheel and select to either Edit Content or Edit Code. Some files are code based pages only and therefore will need to be edited in HTML.
- Add a Page – Click on the Green icon…
- New File – Give this a name and select a template, if none available, then select blank.
- If you like the look of another page you can copy the HTML code from the original and paste it in this one and then make the necessary adjustments.
- Delete a Page:- This will require assistance from the support desk, please contact us.
- Undo / Redo
- Restore to Previous version – Every time you save this is time stamped, so you can restore or revert back as far back as you need to.
Pages
(Note: If this option is not available then refer to Files above as these pages will be listed there)
Banners
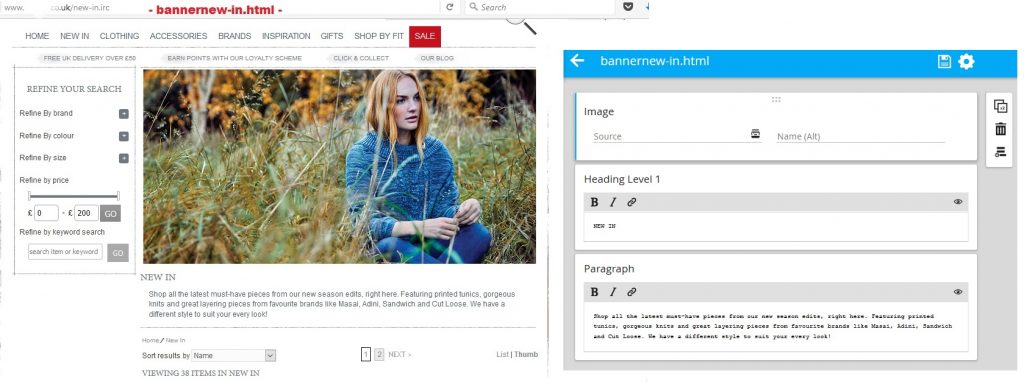
- Edit an Existing Banner – Search/Scroll down for the relevant file name (ie. homeware outdoor weatherproof clothing) and click on the cog wheel to edit content or edit code.
- Add a New Banner – Click on the green + icon, copy/paste the name of the page you would like to create a banner for as for our example it would be ‘homeware-outdoor-weatherproof-clothing’, so from the / to just before the .irc. If a template has been given you can select otherwise you can start from blank. Click on Create and this will add banner to the front of the file name, thus creating a file name as :- bannerhomeware-outdoor-weatherproof-clothing.html
- Rename a Banner:- This isn’t currently added to the new content editor so you’d want to make a new banner and the support team can delete the old one for you..
- Delete a Banner:- This will require assistance from the support team.
Footers
Images
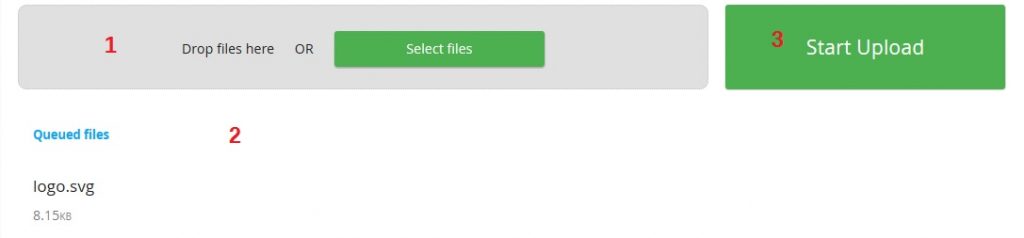
- Upload-To upload the files is as easy as 1-2-3, ie.
- Drop or select the files by clicking in the area,
- Files will be queued
- Click ‘Start Upload’ for it to update and complete
- Edit existing images – Use the same file name and then when you upload as above it will prompt if you want to replace the image, confirm Yes and the new image will be available.
- Delete images – This is currently not possible to be done within the website manager, if you no longer require an image, then contact support desk for it to be deleted.
Tips:
- Image Size – Knowing what size the images being used on the relevant areas of your website is important as the wrong image size can cause the design to go off centre. Using Mozilla Firefox browser open to the page where the image is shown, right-click on the image and select View Image Info. Make note of the pixel (px) size. Always use/upload the correct size image to maintain website framework.
Indicators
- Size – These files need to be a specific size, ie. 85px by 85px.
- Extention – .PNG & .SVG – If you have a responsive website you will need to have a both versions of each image that you would like to use. SVG version can be saved using an editor that supports this.
- Name – Something that is relevant and easy as you will need to add it to System Tags (see below)
- Drop or select the files by clicking in the area,
- Files will be queued
- Click ‘Start Upload’ for it to update and complete
For further information on how to tag (link) your products with the correct indicator image, refer to this help article, ie. System Tags
Meta
This section is used to set up meta policies for pages/products (mainly for SEO).
Redirect
This section is when you set up meta redirects if have moved from another website to IR. (Our SEO).
Reviews
This section stores all reviews that have been placed that require action to either approve or reject reviews.
(This is a paid for feature. To activate it on the website, contact the sales team for further information.)
Simply click on Accept or Reject:-
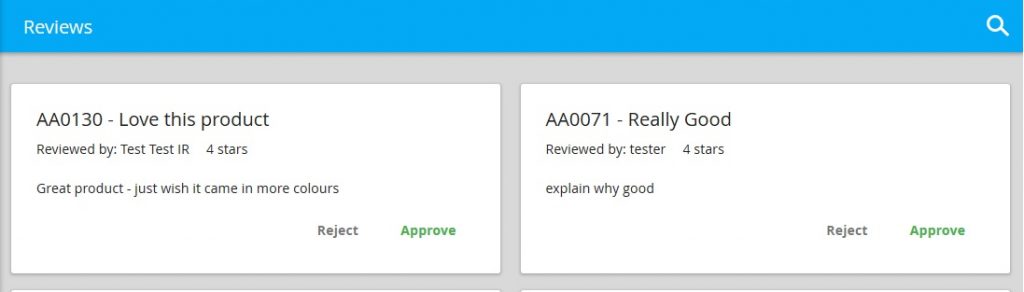
Note: Once a review has been actioned then it cannot be retrieved to make amendments.
Personalisation
This section stores all the personalisation forms that is required to be applied to your products.
(This is a paid for feature. To activate it on the website, contact the sales team for further information.)
All personalisation forms start by clicking on the green + icon, give it a name, use template if available.
Below is an example of personalisation:-
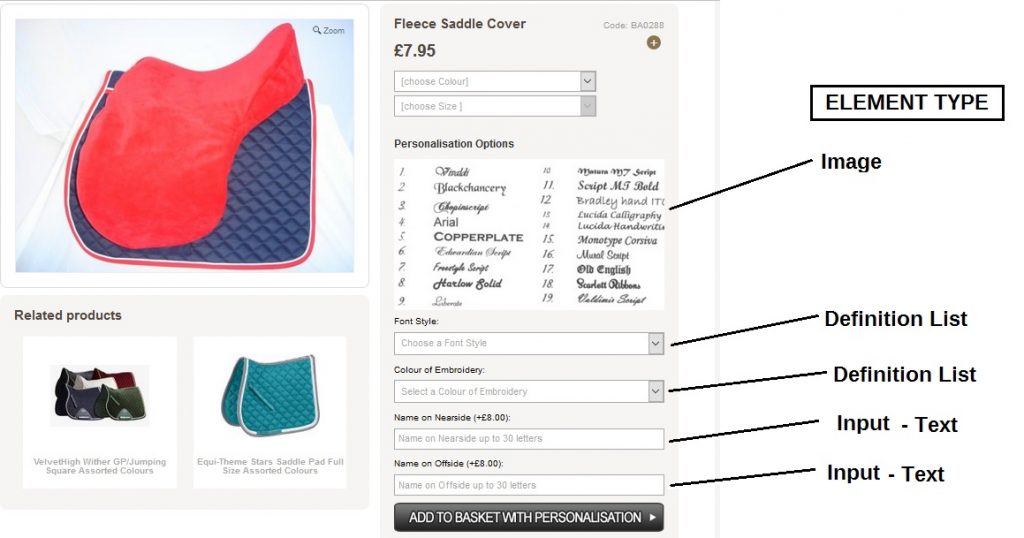
Each section of the form is made of an element, as mentioned above in the Edit Content area.
For further information on how to tag (link) your products with the correct personalisation form, refer to this help article, ie. System Tags
Attributes
This section covers a feature that allows web products to be ‘tagged’ with a specific attribute. For example, if you wanted to give a product a ‘height’ tag in the traditional sense then you’d have to create tags for 10cm, 11cm, 12cm,….100cm etc. But with attributes you could create a ‘height’ attribute and then tag each product with any height number (using the ‘Products’ section of the editor), rather than creating tons of individual tags.
Note: Any attributes here will not appear in the Refine By menu.
Attributes can be of varied types and a predefined list of available variables (comma separated) can be set.
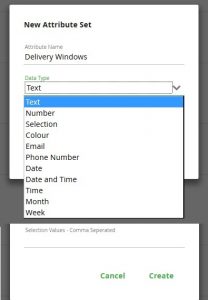
Add a new Attribute:-
- Click on the + icon
- Give it a name
- Select the data type
- Add a comma seperated predefined list
- Click on Create
Edit a new Attribute, click on the Cog wheel and select Edit
Remove an Attribute, click on the Cog wheel and select Remove
Products
This section lists all products on the website (web shop) that have been uploaded. Here you can link Videos, Attachments and Attributes to specific products which will display on the product page.
- Search in top bar for your product by Article Code or Name.
- Click on the Cog Wheel to assign to the product an:-
- Attachment – This can be any .PDF, image file or any attachment you want to use. Simply Upload in this section.
- Attribute– Assign the attribute(s) to this product for which you would like to use. To amend Attributes refer to the section above.
- Video – Here you will place a video URL link of the video you want to display. This can only be a video which is hosted on youtube.com.
During your web design, these elements will be discussed how they will be displayed on the Product page.
Country
This section stores all countries that you would like to ship to and also have registered account users from. You can add, edit and remove countries accordingly. Should you remove the country then customers would not be able to place orders or register accounts from that country.
To add new countries you need to get iso codes from a source like wikipedia on this link https://en.wikipedia.org/wiki/ISO_3166-1. Most countries are added by default so there should be no need to edit this section too much.
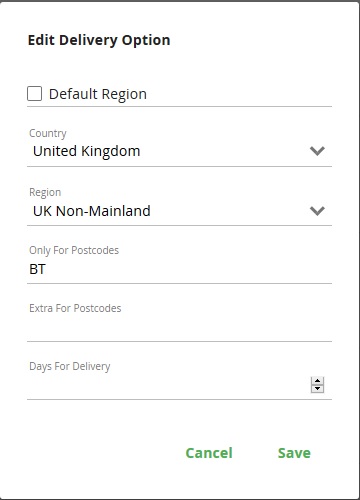
Delivery
This section is used to map specific Delivery regions against Countries and also define which post codes you would like to include or exclude from that country/region.
- Default Region – Check this box if this will be the default mapping that will be used for any countries without a specific mapping
- Country – Select a country from the drop down
- Region – Select the desired delivery region – These are setup in Connect-Back Office under Tools > Configure > Carriage Regions.
- Only for postcodes – Used to identify the postcode within this region ONLY if the delivery postcode starts within the list of postcodes defined. Use a comma separator to define the list.
- Extra for postcodes – Can be used to show the region as an additional open for the postcodes
- Days for Delivery – Enter a value here if you are a Google Certified Shop. This will be transferred across should this be used.
Example: Setup Northern Ireland as part of UK Non-Mainland where they have BT postcode.
Style
This section stores all the style sheets that make the website bespoke. This is CSS coding, so if you are not familiar, then we suggest you leave this section as is.
Script
This section stores all custom javascript files, where you can add/edit. If you are not familiar with JavaScript, then we suggest you leave this section as is.