
This guide will take you through the WorldPay Payment Gateway integration process for your website.
Description
- Setting Up the Back Office for Test Transaction
- Setting Up WorldPay for Test Transaction
- Processing Test Transaction
- Switching WorldPay to Live Mode
- Setting Up the Back Office for Live Transaction
- Setting Up WorldPay for Live Transaction
- Processing Live Transaction
- Setting Up the Back Office for Test Transaction
| 1 | Sign up for an account with WorldPay | |
|
2 |
Go to Back Office->Multichannel->Web Shop- >Website |
 |
|
3 |
Set Payment Status to ‘Test Payments’ |
 |
| 4 | Select ePayment Services Provider as WorldPay | |
|
5 |
Enter WorldPay Installation ID which you can find after logging into https://secure.worldpay.com/merchant/ in the Installations Section | |
| 6 | Complete a Full Upload to website | |
|
7 |
If for some reason the website isn’t in test payments mode, you will need to contact the Helpdesk who can change this manually |
2. Setting Up the WorldPay for Test Transaction
|
1 |
Login to https://secure.worldpay.com/merchant/ and go to your Installations section |
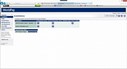 |
| 2 | Click on a Spanner Icon in ‘Integration Setup: TEST’ column | |
|
3 |
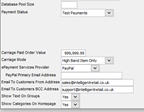
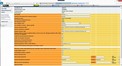
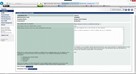
On this page you will need to provide the following information:
a) Payment Response URL – Your domain followed by /postpp.jsp like https://tempurl.irconnect.co.uk/yourname/postpp.jsp b) Tick the box called ‘Payment Response Enabled’ c) Tick the box called ”Shopper Redirect button enabled”; d) Set the value of ‘Shopper Redirect URL’ field to Your domain followed by /thankyou.jsp like https://tempurl.irconnect.co.uk/yourname/thankyou.jsp e) Tick the box called “Enable Shopper Response” f) Enter your email for failed payments notifications in ‘Payment Response failure e-mail address’ g) Enter your email for your copies of receipts for successful payments in ‘Merchant receipt email address’ h) Enter value for Payment Response Password which is ‘tcennoc’ i) Click on ‘Save Changes’ button |
 |
- Processing Test Transaction
| 1 | Go to your website and add something to the basket | |
| 2 | Login under existing account or checkout as a guest | |
|
3 |
After providing all your details select to pay with ‘WorldPay’ | |
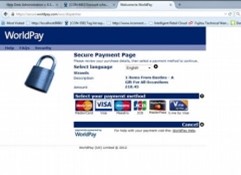
| 4 | At this point you should be redirected to a page on which you will need to enter your card details. You can use any card as you will not be charged for a test transaction | |
|
5 |
After providing all details submit the payment |
 |
| 6 | You should see a confirmation page with Transaction ID | |
| 7 | Write down this Transaction ID as you will need it later |
4. Switching WorldPay to Live Mode
| 1 | Open https://secure.worldpay.com/merchant/ and login | |
|
2 |
Go to the Installations section again and click on ‘Tick’ image in ‘Start Trading’ column | |
|
3 |
A new page will open and, on this page, you will need to provide the following:
a) Your website URL for activation – Provide your temp URL. b) in Text box called ‘Please advise us how to carry out a test transaction on your site’ you will need enter instructions for WorldPay on how they can checkout on your website to make sure that everything is up to their standard. Usually writing “You can register for a new account on the website. Once you are logged in please add product to the basket and follow the checkout steps.” is enough. c) Click on ‘Save Changes’ button |
 |
|
4 |
At this point you should be redirected to page on which you will need to enter your card details. You can use any card as you are not going to be charged because it is a test transaction | |
|
5 |
After that’s done WorldPay will send you and email within 24-48 hours confirming that your account is live, and you can start trading |
5. Setting Up the Back Office for Live Transaction
| 1 | Go to Back Office->Multichannel->Web Shop->Website | |
|
2 |
When the setting page is loaded please set payment status to ‘Live Payments’ and proceed with Full Upload |  |
|
3 |
If for some reason the website isn’t in test payments mode, you will need to contact the helpdesk and we will change this manually | 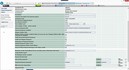 |
- Setting Up the Back Office for Live Transaction
|
1 |
When the full upload has finished you will need to go to https://secure.worldpay.com/merchant/ again | |
|
2 |
Click on a Spanner Icon in ‘Integration Setup: PRODUCTION’ column |
|
|
3 |
On this page you will need to provide the following information:
a) Payment Response URL – Your domain followed by /postpp.jsp like https://www.yourwebsite.co.uk/yourname/postpp.jsp b) Tick the box called ‘Payment Response Enabled’. c) Tick the box called ”Shopper Redirect button enabled”. d) Set the value of ‘Shopper Redirect URL’ field to Your domain followed by /thankyou.jsp like https://www.yourwebsite.co.uk/thankyou.jsp e) Tick the box called “Enable Shopper Response”. f) Enter your email for failed payments notifications in ‘Payment Response failure e-mail address’. g) Enter your email for your copies of receipts for successful payments in ‘Merchant receipt email address’. h) Enter value for Payment Response Password which is ‘tcennoc’. i) Click on ‘Save Changes’ button. |
7. Processing Live Transaction
| 1 | Go to your website and add something to the basket | |
| 2 | Login under existing account or checkout as a guest | |
|
3 |
After providing all your details select to pay with ‘World Pay’ | |
|
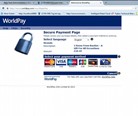
4 |
At this point you should be redirected to page on which you will need to enter your card details. This is a LIVE transaction so please remember that YOU WILL BE CHARGED for what you order on the card used. However, you can refund it later | |
| 5 | After providing all details, submit the payment | |
|
6 |
When the payment has been processed successfully, you should see redirect to merchant button or be redirected back to your website within few seconds |
 |
|
7 |
Congratulations WorldPay is now fully integrated to your website! |